![po-up card []](http://www.diy-guides.com/wp-content/uploads/2009/10/po-up-card-.jpg "po-up card []")
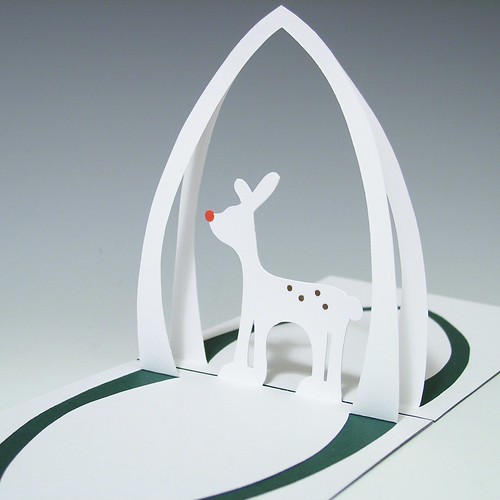
During Christmas or any other celebrations, you will always have some difficulties in looking for proper greeting cards to send to family members or friends, especially when you try to find an unusual greeting cards that no one else have the same idea to send it to you. Below is an example for creating a unique reindeer pop-up (or you can choose your own design if you like such as Angel, Santa etc) greeting card together with your kids or family. It is a simple task to do and provides you to create your very own creation through your creativity. This greeting card can also be use for decorating your house.
Top 10 Gift Ideas for Men OR Top 10 Gift Ideas fro Women
What you need:
- Construction paper or heavy or cardstock paper (you can choose your own preferred colours)
- Ruler
- Paper clip
- Ballpoint pen without ink in it
- Scissors
- Art supplies such as colouring pen
Method:
- First of all, you need to design the full size of the following image (Step 1) on a heavy paper, like card stock or construction paper.
- Then print out the following image (Step 2) in a similar manner with heavy paper.
- After you have finished doing the dotted line, you need to press along the dotted line on the centre of the card either by using the rounded end of a paper clip, or a ballpoint pen, using a ruler as a guide.
- After finishing Step 3, you can use the same method from Step 3 and press along the dotted lines of pop-up pieces from Step 1.
- You need to slowly cut out the card in-line with the solid black lines.
- You need to cut out the deer pieces slowly by following the solid black lines with extra careful especially around the antlers.
- After you have cut off the antler’s piece, you need to fold it with both sides away from you so the centre dotted line comes up towards you and do not forget to crease it well.
- Then you need to gently take hold of the small right tab that you can see at the bottom of the antler’s piece.
- Then, you have to fold the small right tab up and crease it well before releasing the tab and put it back into its original position.
- After that, you have to repeat the previous two steps with the left tab and set the antlers aside.
- Then, you need to place the reindeer\’s head on flat surface in order for you to take hold of the small tab at the top.
- You have to fold the small tab against the head and crease it well before releasing the tab and put it back into its original position.
- After that, you need to fold the right side of the reindeer\’s head over to the left and crease it well before returning the right side to its original position.
- Then, you have to fold the head down towards the body and crease it well before returning the head to its original position.
- Fold the body enabling both sides to fold away from you while the centre dotted line comes up towards you and crease it well.
- Fold up the small right tab at the bottom of the body, crease it well enough and then return the tab to the original position. Then, fold up the left tab, crease it and also return it to the original position.
- Then, you need to apply a small amount of glue to the tab at the top of the reindeer\’s head.
- Fold the tab up and over to the reindeer\’s back body and press it together until the glue dries.
- After that, you need to fold the card in half along the centre dotted line and crease it well.
- To ensure the dotted lines are not visible, you need to turn the antlers over and then, apply a small amount of glue to each tab at the bottom.
- After that, turn the antlers back over so that the dotted lines are visible. By using guides on the card, you need to align the antlers, press it down into position allowing the glue to dry.
- Then, turn the body over for you to be able to see the dotted lines and apply a little bit of glue to each tab at the bottom.
- Turn the body back over in order to see the dotted lines. By following guides on the card, you need to align the body and press down into position enabling the glue to dry.
- Wait until after the glue has dried, and slowly close the card. You might have to use your fingers to assist in folding back the card.
- Close the card completely and the pop-up Reindeer greeting card is ready to be decorated or send to your friends.
If you managed to decorate some of the ideas mentioned above, you will have a unique self-made pop-up greeting card for you to send to family members or friends.
Top 10 Gift Ideas for Men OR Top 10 Gift Ideas fro Women
Additional Reading:
http://www.wikihow.com/Make-a-Reindeer-Pop-up-Card-%28Robert-Sabuda-Method%29
Image Credit:
http://farm3.static.flickr.com/2271/2076982127_4f3a4070fa.jpg
